Table of Contents
Plasmid Profiler
개요
블로그에 작성했던 글: Docker를 통해 배우는 Galaxy와 Plasmid Profiler ⇐ 이 글에서는 중간 단계에 데이터가 처리되는 방식에 대하여 학습한 것을 설명해 놓았다.
간단한 설명
Plasmid profiler is a pipeline to perform comparative plasmid content analysis. It is designed to rapidly bin plasmid content using KAT, Short Read Sequence Typing, and BLAST followed by scoring hits based on a combined measure of maximized coverage and minimized sequence divergence. Hits are then visualized in both static and interactive heatmaps as well as arranged as tabular results. Input is provided in the form of a collection of whole genome sequence reads along with a reference plasmid database and replicon/gene of interest database. The output from the pipeline consists of a png heatmap, an interactive html heatmap, and tabular format results of all plasmids identified and their respective scores. (출처: Read the Docs)
- [bioRxiv] Plasmid Profiler: Comparative analysis of plasmid content in WGS data 링크
- [Read the Docs] http://plasmid-profiler.readthedocs.io/en/latest/
Plasmid Profiler는 Galaxy 환경에서 돌아가는 workflow이다. 그런데 컴퓨터에 직접 galaxy를 설치하는 것이 만만치가 않다. 그럴때 쓰라고 docker가 있는 것이다.
작동 순서 설명
약간 복잡하므로 잘 읽고 이해하기 바란다.
- 다음의 input file을 준비한다.
- a set of sequence reads in FastQ format
- a reference plasmid database (supplied; N=2,797; size range 1,065-727,905 b; 188.3 MB): pp_plasmid_database.fasta - Full-length plasmid 서열의 NR 데이터베이스에 해당.
- plasmid finder replicon database along with genes of interest (supplied but user-modifiable; 58.1 MB): plasmidfinder_plusAMR.fasta - 이것은 plasmid rep gene과 일부 AMR gene의 모임이다. 기본 DB에는 겨우 5 개의 AMR gene이 수록되어 있다. 서열 ID는 '(AMR)OXA181_JN20580' 형식이다.추가적으로 2145개의 AMR을 더한 것이 plasmidfinder_plusAMR2.fasta 파일이다(내가 만든 것).
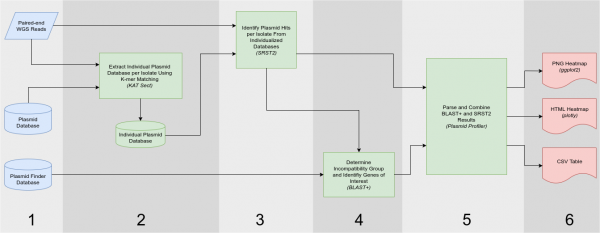
- (KAT) unrepresented Gammaproteobacteria plasmid 서열을 제거하고 객 샘플에 대해서 개별적인 plasmid DB를 생성한다.
- (SRST2) 개별 plasmid DB에 read를 bowtie2로 매핑하여 putative plasmid hit을 찾는다. At this stage of the pipeline, SRST2 is run using the “Custom Virulence Database” parameter with the individualized plasmid databases serving as the SRST2 database for their respective isolate.
- (BLAST) SRST2에서 확인된 plasmid sequence로 custom BLAST DB를 만든 뒤 이를 대상으로 PlasmidFinder DB 유래 116개 plasmid replicon을 검색한다(MegaBLAST).
- (Plasmid Profiler R 패키지) Heat map에 의한 visualization
사용법
Docker 설치하기
Docker Plasmid Profiler 실행 방법
루트 권한으로 다음과 같이 입력하라. 종료한 뒤에는 하드디스크에 아무것도 남지 않는다.
# docker run -t -p 48888:80 phacnml/plasmidprofiler_0_1_6
그러나 도커를 셧다운한 뒤 다시 실행하면 이전에 작업한 파일이 남아있지 않게 된다(기본 동작). 데이터가 계속 남아있게 하려면 다음과 같이 실행하면 된다. galaxy_storage 디렉토리는 미리 만들지 않아도 된다.
# docker run -t -p 48888:80 -v /data/apps/galaxy_storage/:/export/ phacnml/plasmidprofiler_0_1_6
sftp를 통해서 대용량의 파일을 전송하려면 다음과 같이 하여라. 웹 브라우저에서 전송 가능한 파일의 크기에는 한계가 있음에 유의할 것.
# docker run -i -t -p 48888:80 -p 8022:22 -v /data/apps/galaxy_storage/:/export/ phacnml/plasmidprofiler_0_1_6
sftp를 통한 파일 전송은 다음과 같이 8022번으로 접속하여 실행한다. 파일이 저장되는 위치는 /data/apps/galaxy_storage/ftp/admin@galaxy.org이다(root 접근 가능).
$ sftp -v -oPort=8022 -o User=admin@galaxy.org localhost
Running Plasmid Profiler
웹 브라우저에서 돌아가는 Galaxy 환경에서 PlasmidProfiler를 실제 실행하는 방법은 Read the Docs - Usage 항목에 상세하게 나온다.
- 웹 브라우저에서 http://localhost:48888 또는 http://ip_address:48888로 접속하여라. 로그인 ID는 admin@galaxy.org, 암호는 admin이다.
- Shared Data > Data Libraries > Plasmid Profiler > Databases에서 pp_plasmid_database.fasta를 선택하여 Add to History를 실행한다. 이때 History를 새로 만든다.
- 별도로 준비한 plasmidfinder_plusAMR2.fasta 파일을 Get Data 기능으로 업로드한다.
- Sequence reads를 업로드하여 dataset collection을 만든다. 데이터 파일이 많거나, 파일 하나의 크기가 2GB를 넘어서 http 전송이 불가능하면 sftp(8022 포트)로 미리 전송하는 것이 좋다. sftp로 미리 업로드한 파일은 Get Data > Upload File from your computer에서 Choose FTP file을 클릭하면 된다. — Haeyoung Jeong 2018/10/15 17:35 왜 “Choose FTP file” 버튼이 안보이지?
- Type은 fastqsanger 혹은 fastqsanger.gz으로 한다. 업로드 완료된 파일은 오른쪽 History 창에 나타날 것이다.
- 모든 fastq file을 선택하여(맨 처음 히스토리에 등록한 database file 두 개는 제외) For all selected > Build List of Dataset Pairs를 실행한다. 작업이 완료되었는지는 History 창을 보면서 확인한다. 종종 Refresh history 버튼을 클릭하라.
- (여기는 좀 불확실하다. 정확한 사용법을 파악하기 전에는 압축을 해제한 fastq file을 사용하는 것을 권한다) fastq.gz을 업로드하였으면 Collection Operation > Unzip Collection을 선택하여 실행한다. 그런데 완료 여부를 알기가 어렵다. Paired fastq.gz을 업로드한 경우의 정상적인 실행 방법은 좀 더 알아봐야 한다. 그리고 워크플로우 내부에서 압축을 해체하는데 어차피 시간이 걸리니 압축을 하지 않은 원본을 ftp로 올리는 것이 더 나을지도 모른다.
- Interleaved file은 쓰지 못한다. 왜냐하면 PlasmidProfiler workflow가 사용할 파일은 paired end fastqs임이 명시되어 있기 때문이다. Workflow를 수정하지 않는 이상 불가능하다고 생각된다.
작동 멈추기
Plasmid Profiler를 멈추려면 docker ps를 실행하여 현재 구동 중인 도커 컨테이너의 ID를 확인한 뒤, docker kill <containier id>를 입력하면 된다.
Your workplace
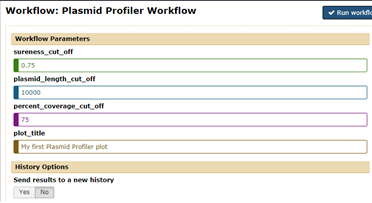
여기에는 기본으로 적재된 Plasmid Profiler Workflow(19 단계) 이외에 내가 만든 워크플로우가 포함되어 있다.
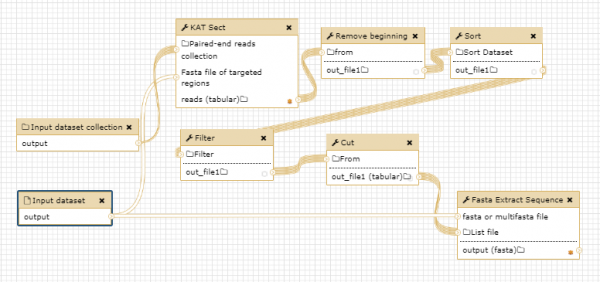
 왜 나는 기본 워크플로우를 수정하려고 했는가? Plasmid profiler는 플라스미드 서열을 조립하여주는 도구가 아니다. 하지만 훌륭한 curated plasmid database에 대해 매핑(SRST2 - 정확히 말하자면 pathogen typing)까지 실시한다면 조립은 왜 못하겠는가? 물론 내가 훌륭한 Galaxy 프로그래머라면 원하는 기능을 부여하여 새로운 워크플로우를 만들면 되지만 아직 그럴 수준은 아니다. 따라서 Plasmid profiler를 살짝 변형하여 그 중간 결과를 취한 다음, 이를 가지고 수작업으로 원하는 일을 이루려는 것이다.
그렇다면 내가 원하는 중간 결과물은 어디에 있는가? 우선 오른쪽의 History 패널을 보라. Dataset pair ⇒ Reads ⇒ Remove beginning/Sort/Filter/Cut on collection # ⇒ Fasta Extract Sequence on collection #로 이어지는 결과물이 보일 것이다. 이를 클릭하면 각 샘플에 대한 결과 링크가 있고, 이를 클릭하면 pp_plasmid_database.fasta에서 hit한 대상이 multi-FASTA file로 주어진다.
플로피디스크 아이콘을 클릭하면 파일로 저장할 수 있다. 파일 형식은 Galaxy617-[Fasta_Extract_Sequence_on_data_576_and_data_329__Fasta].fasta라서 샘플(균주) 이름이 직접적으로 드러나지 않으니 잘 관리해야 한다. 혹은 [i](View details) 아이콘을 클릭하여 표시되는 Job Information 항목에서 데이터 파일의 경로를 알 수 있다.
Full Path: /export/galaxy-central/database/files/007/dataset_7065.dat
/export 디렉토리는 docker 실행 시에 /data/apps/galaxy_storage로 연결하였으므로 여기를 뒤지면 된다.
Haeyoung's Plasmid Profiler v0.1
맨 마지막의 BLAST 단계를 생략한 것이다. 당연히 heat map은 생기지 않는다.
(No SRST2) Haeyoung's Plasmid Profiler v0.2
다른 플라스미드 분석 자료
- PLACNETw: a web-based tool for plasmid reconstruction from bacterial genomes. PubMed Nucl. Acid. Res. (2017) 웹사이트 PLACNET original paper (PLoS Genetics 2014)
- A curated dataset of complete Enterobacteriaceae plasmids compiled from the NCBI nucleotide database. PMC data download (Figshare repository)


